Advanced static website hosting with Amazon S3 and CloudFront

Today we will dive deep into the world of hosting a static website on Amazon S3 using CloudFront. If you’re looking for a secure, reliable, scalable, cost effective and performant solution, you’ve come to the right place.
In this blog post, we’ll start by revisiting the baseline architecture discussed previously in Hosting a static website on Amazon S3 and identify areas where we can make improvements for a more robust solution. We’ll then define the target architecture and take a deep dive into the step-by-step process of setting up the infrastructure.
So let’s dive in and explore the process of creating a static website using Amazon S3 and CloudFront.
Baseline architecture
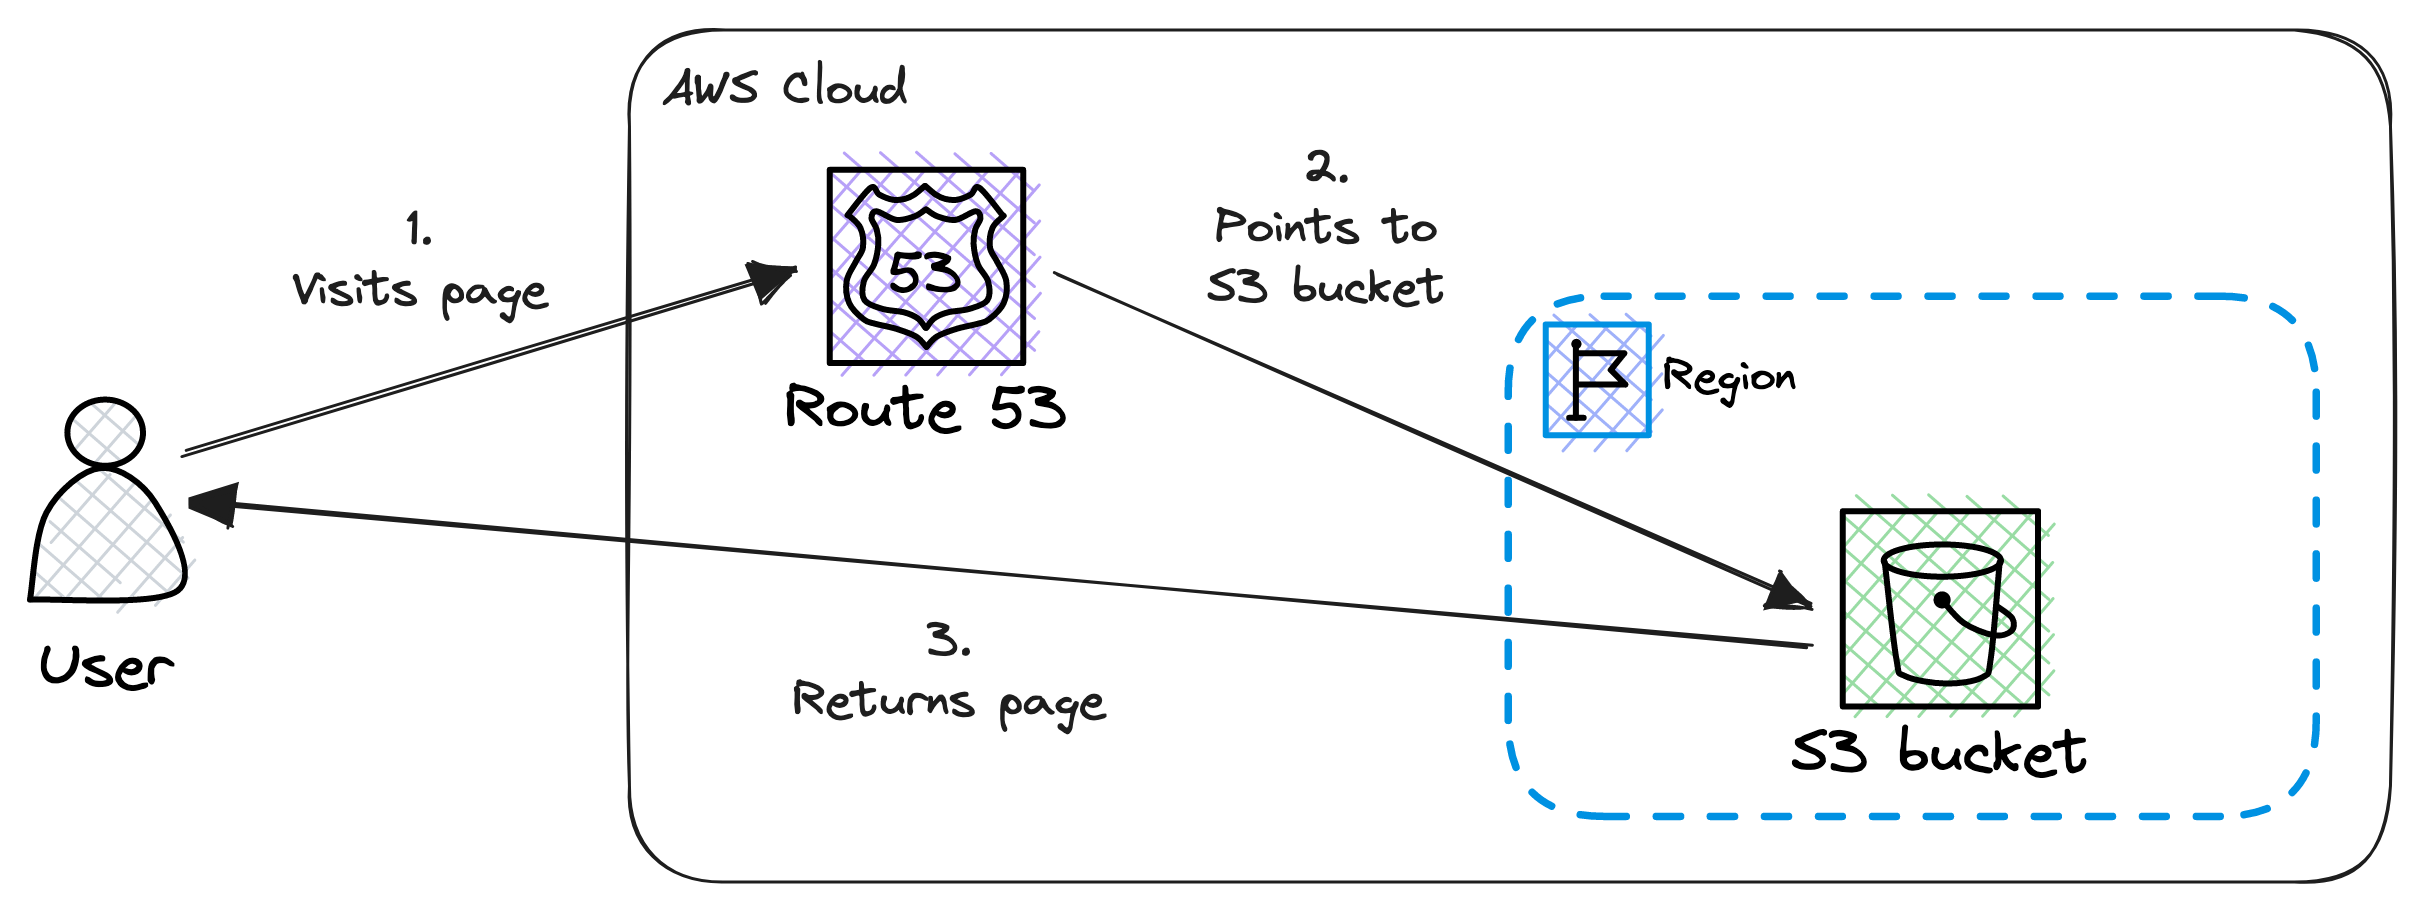
Let’s quickly recap how the baseline architecture looks like.
It is quite simple, we have only 2 components: Amazon S3 and Route 53. Where S3 is doing the heavy lifting, the website hosting and Route 53 is responsible for handling DNS related things.
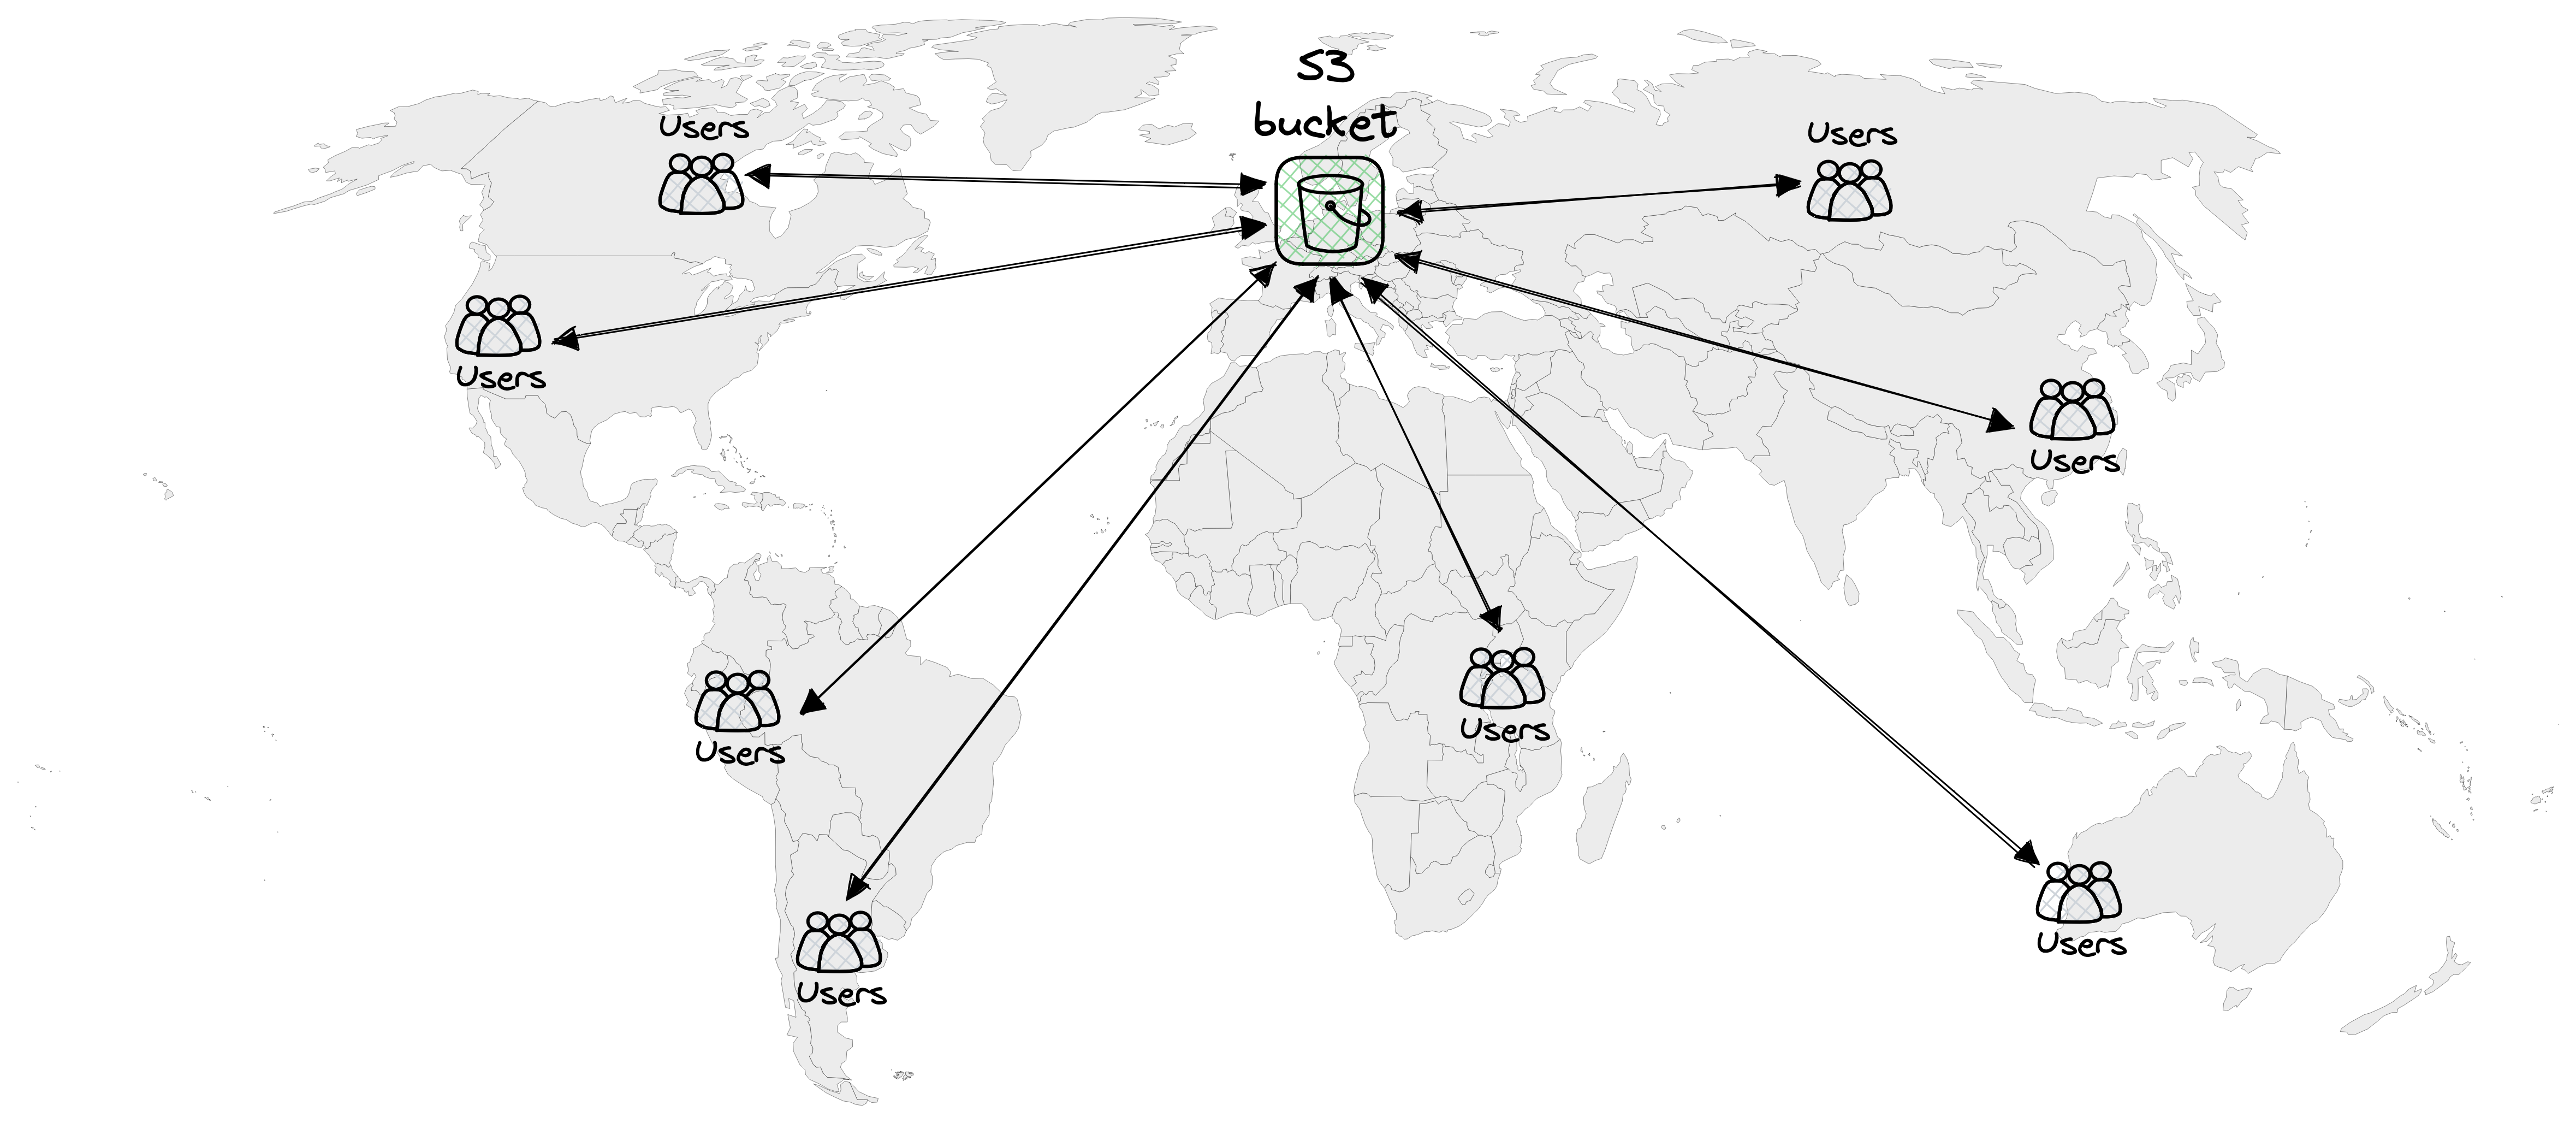
Now, let’s explore how users can access the website from various locations across the globe.
What can we improve?
In my previous post I mentioned the following possible improvements:
- Make it more scalable and performant by using a content delivery network (CDN).
- Make the S3 bucket private and the website should be only accessible through the CDN.
- Get usage related data by enable logging.
- Add error handling and feedback.
- Make the communication secure by using HTTPS (encrypt data in transit).
Let’s check them in details.
Using a CDN
Amazon S3 has a built-in scalability feature that allows it to handle increasing traffic seamlessly. It can handle a large number of HTTP requests without any problems or issues. In addition, it is highly available, it promises 99.9% availability (SLA).
Using S3 exclusively for website hosting has a few drawbacks to consider:
- The user experience may be slower for visitors located far from the S3 bucket’s region.
- S3 imposes charges not only for data storage but also for outbound traffic from the bucket.
Using CloudFront in combination with S3 offers several benefits over using S3 exclusively for hosting the website:
- Improved performance: CloudFront is a global Content Delivery Network (CDN) service that caches the website’s content in edge locations worldwide. When a user requests content from the website, CloudFront serves it from the edge location nearest to them, reducing latency and improving response times. This ensures a faster and more responsive user experience.
- Scalability: CloudFront automatically scales to handle high volumes of traffic. It distributes the load across its global network of edge locations, reducing the burden on the origin server. This allows the website to handle sudden traffic spikes without performance degradation or downtime.
- Cost efficiency: CloudFront’s pay-as-you-go pricing model makes it cost-effective for websites of all sizes. With it, we only pay for the data transfer and requests made by the users. By caching content at the edge locations, CloudFront reduces the amount of data transferred from the origin server, helping to lower the bandwidth costs.
- Analytics: CloudFront provides detailed logs and metrics, allowing us to monitor the performance of the website and gain insights into user behavior. This data can help optimizing the website’s content and make informed decisions to improve the user experience.
By using CloudFront for the website, we can significantly enhance performance, improve scalability and lower costs. These advantages make CloudFront an essential component for delivering a fast, reliable, and scalable web experience to visitors.
Limit access to the S3 bucket
Limiting access to the S3 bucket (where we store the website’s data / content) only to the associated CloudFront distribution offers several benefits:
- Content protection: Limiting access to the S3 bucket, prevents users from bypassing CloudFront and accessing the content directly. This helps to protect the content from unauthorized downloads.
- Improved security: By restricting access, we minimize the attack surface and reduce the risk of unauthorized access.
- Enhanced performance: CloudFront caches and serves the content from the edge locations closest to the users, reducing latency and improving the overall performance of the website.
- Cost optimization: By enforcing access restrictions, we can optimize costs associated with data transfer and storage. When users access the content through CloudFront, it utilizes a caching mechanisms to serve the content from edge locations, reducing the load on the S3 bucket and minimizing data transfer costs.
By restricting access to the S3 bucket only to the associated CloudFront distribution, we enhance security, protect the content, optimize costs and improve performance.
Adding error handling and feedback
When a user attempts to access a resource that doesn’t exist, S3 and CloudFront display an error message. However, this message can be overly technical and not very user-friendly.
To enhance the user experience, it’s important to provide more user-friendly error messages that are easy to understand.
Enable logging
CloudFront provides different kinds of logging (standard and real-time), enabling them offers several benefits:
- Access and monitoring: CloudFront logging provides detailed access logs that capture information about every request made to the website. These logs include valuable data such as the time of the request, the requested resource, the client’s IP address, response status codes, and more. Analyzing these logs helps to gain valuable insights.
- Debugging and troubleshooting: With CloudFront logs stored in S3, we have a centralized location to track and investigate any issues or errors occurring on the website.
- Performance optimization: CloudFront logs provide valuable data for optimizing the performance of the website. By analyzing the logs, we can identify frequently accessed resources, popular content, and patterns in user behavior.
Enabling CloudFront logging to S3 ensures that we have a comprehensive and centralized record of website access, enhances debugging and troubleshooting capabilities.
CloudFront’s logging offers much more than the above mentioned, please checkout their documentation on the topic: Reports, metrics, and logs
Using HTTPS
Using HTTPS (Hypertext Transfer Protocol Secure) offers several benefits:
- Security: HTTPS encrypts the data transmitted between the website and the user’s browser. It prevents unauthorized access, eavesdropping, or tampering with the data during transit.
- User trust: HTTPS provides a visual indicator, such as a padlock icon, in the browser’s address bar, indicating that the connection is secure. This instills trust and confidence in the visitors, assuring them that their information is protected and reducing the risk of potential security concerns.
- SEO advantage: Search engines prioritize websites with HTTPS in their search results. Having HTTPS can positively impact the website’s search engine ranking and visibility, potentially leading to increased organic traffic.
Overall, using HTTPS is a must now days because of security, user trust, SEO advantages, protection against cyber threats, and maintaining a professional online presence.
To enable HTTPS on the website, obtaining an SSL certificate is necessary, and this requires a Certificate Authority (CA). For example, we can rely on the AWS Certificate Manager to acquire SSL certificates for the website.
Target architecture
Having reviewed the baseline architecture and identified areas for improvement in terms of performance, security, cost-effectiveness, and user experience, let’s now move our focus to the target architecture.
Main components
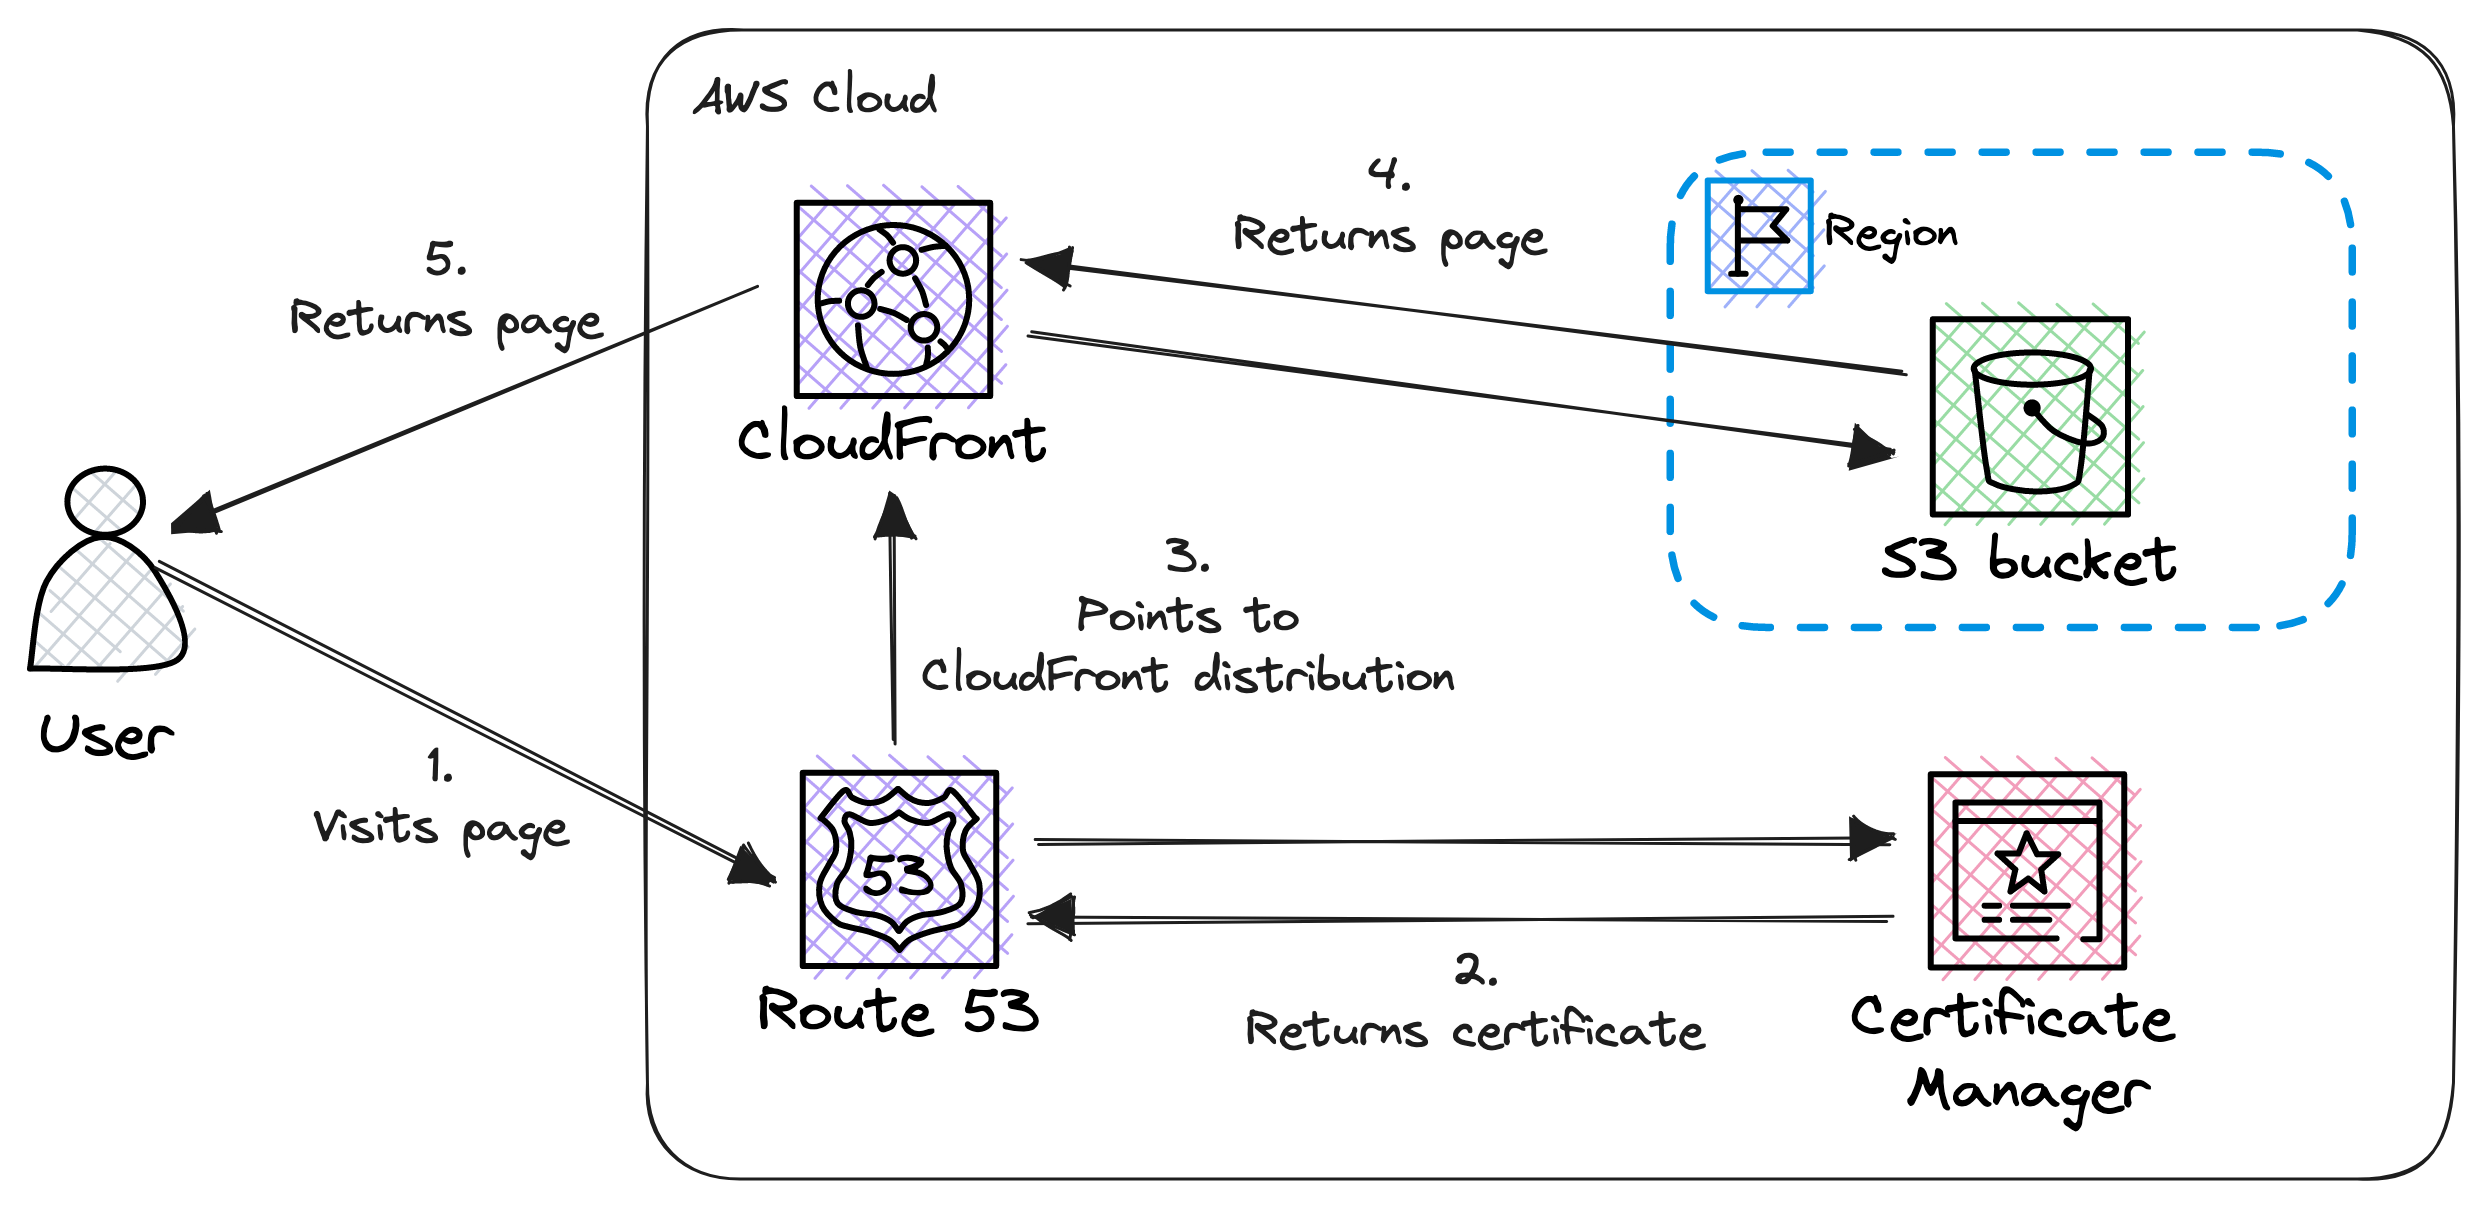
Let’s identify the main components:
- Route 53: It is responsible for managing the website’s domain name and pointing to the CloudFront distribution.
- Certificate Manager: It is the certificate authority and issuing the SSL certificate for HTTPS.
- CloudFront: It is the CDN and serves as the cache for the website’s content.
- S3: It is storing the website’s content and serves as the origin for the CloudFront distribution.
CloudFront edge location caching
Let’s check how users can access the website from different locations around the world.
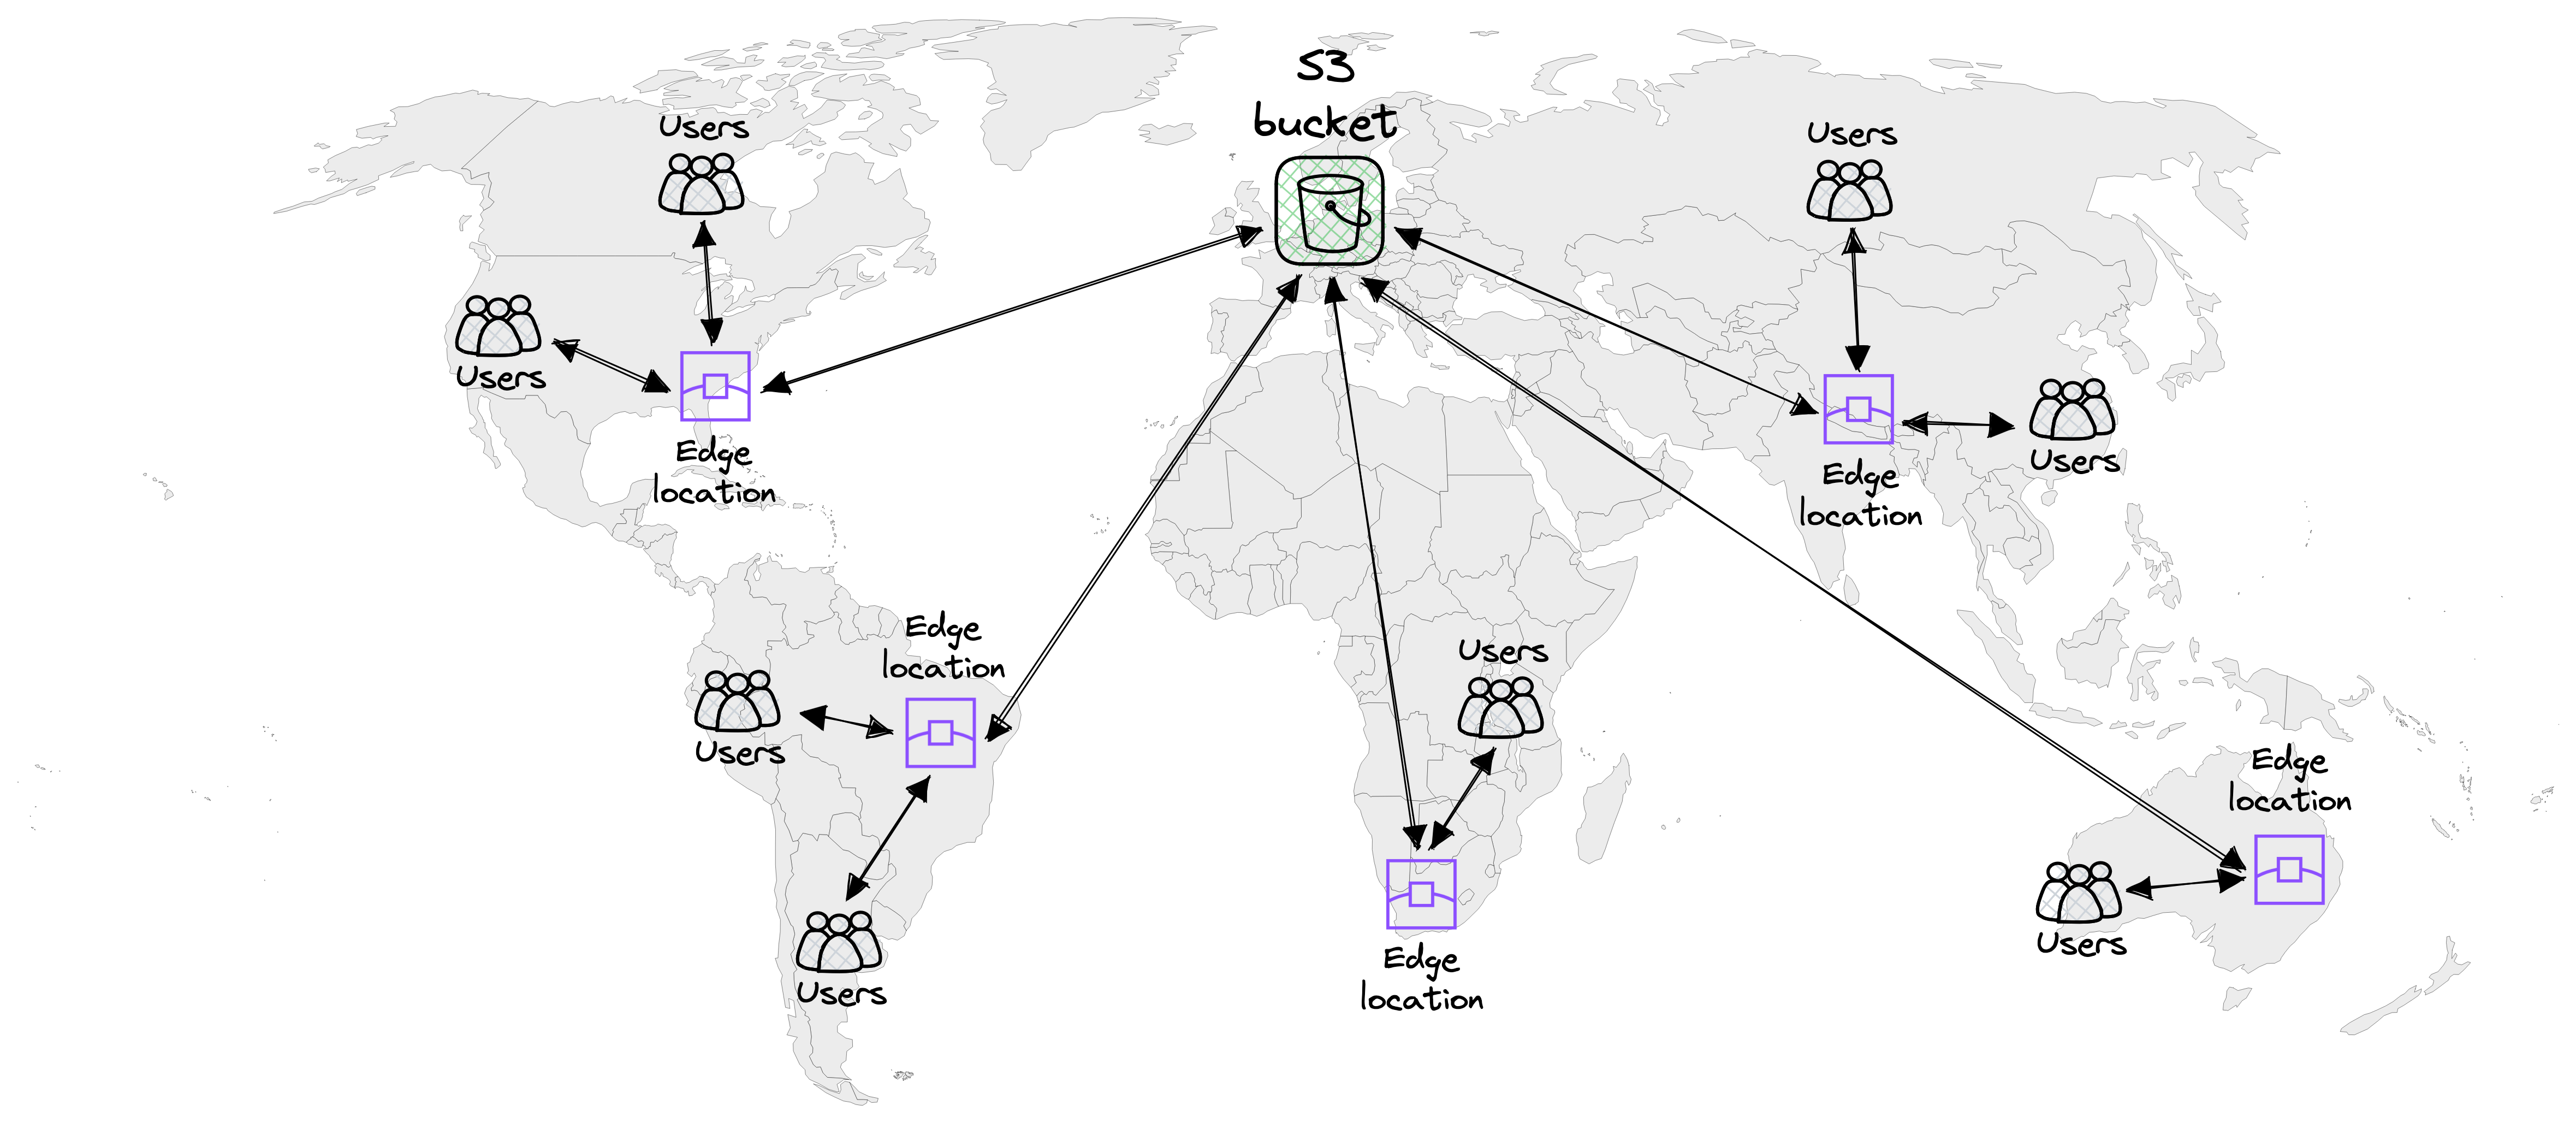
When accessing a static website hosted on S3 using CloudFront, users do not connect directly to the S3 bucket itself. Instead, they connect to the nearest CloudFront edge location.
This approach significantly reduces latency and improves content delivery by leveraging CloudFront’s global network of edge locations. By routing user requests to the nearest edge location, we ensure faster access to the content, resulting in a more seamless and responsive user experience.
CloudFront functions
Let’s explore the utilization of CloudFront functions.
There is an objective that cannot be accomplished solely through CloudFront configuration:
- Rewriting the URL: default object (in our case “index.html”) for the root and all other URLs
To make our website more secure, we need to add certain HTTP headers to every response. This can be achieved in 2 ways:
- By adding a CloudFront function
- By adding a CloudFront policy
In this post we will go with the first one and solving it via a CloudFront function. Please check the following article for more details on the CloudFront policy based solution: Adding or removing HTTP headers in CloudFront responses
The diagram below illustrates the role of the CloudFront functions.
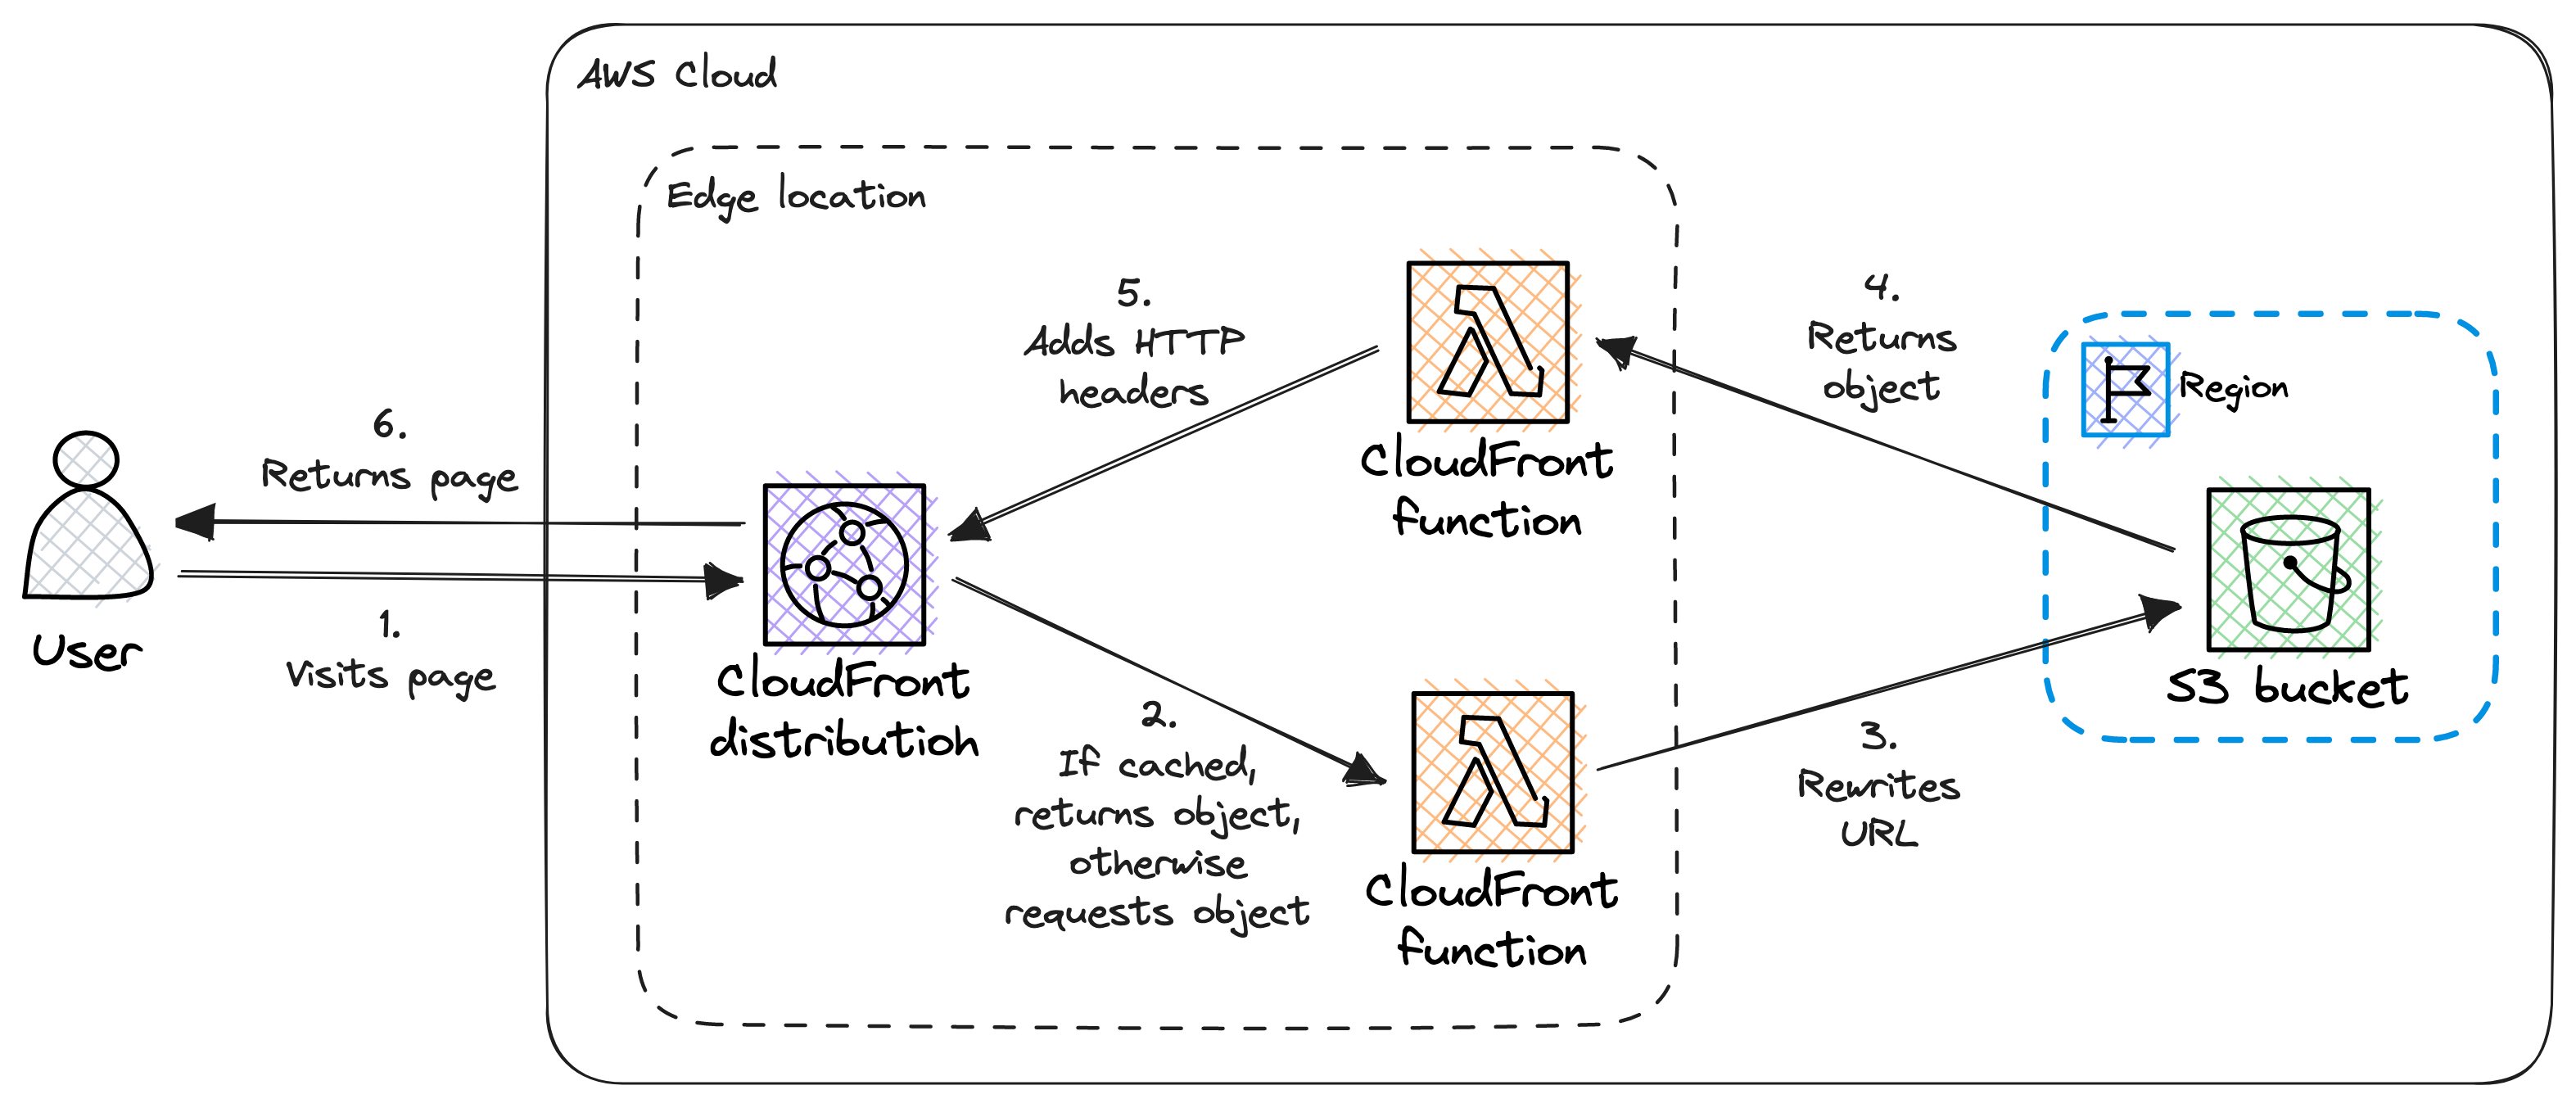
Rewriting the URL
We can configure CloudFront to have a default root object, so when we try to access the website, for example by visiting https://www.my-website.com/ we will be navigated to https://www.my-website.com/index.html
This is really helpful, however insufficient, because if we visit https://www.my-website.com/blog/hello-world/ we are not navigated to https://www.my-website.com/blog/hello-world/index.html instead we get an ugly 403 (Forbidden) error.
Luckily there is a solution. We need a simple CloudFront function to rewrite the URL by appending “index.html” to it on every request:
function handler(event) {
    var request = event.request;
    var uri = request.uri;

    if (uri.endsWith('/') === true) {
        request.uri += 'index.html';
    } else if (uri.includes('.') !== true) {
        request.uri += '/index.html';
    }

    return request;
}
The source code can be also found on GitHub.
Adding HTTP headers
We will add HTTP security headers, which are response headers specifically designed to enhance the security of the website. These headers provide instructions to browsers on how to behave, mitigating potential vulnerabilities and safeguarding the well-being of the users.
Let’s explore the CloudFront function which modifies the response:
function handler(event) {
    var response = event.response;
    var headers = response.headers;

    headers['strict-transport-security'] = { value: 'max-age=63072000; includeSubdomains; preload' };
    headers['content-security-policy'] = {
        value: "default-src 'none'; connect-src 'self'; manifest-src 'self'; img-src 'self' 'unsafe-inline' data:; script-src 'self' 'unsafe-inline'; style-src 'self' 'unsafe-inline'; object-src 'none'; frame-ancestors 'none'"
    };
    headers['x-content-type-options'] = { value: 'nosniff' };
    headers['x-frame-options'] = { value: 'DENY' };
    headers['x-xss-protection'] = { value: '1; mode=block' };
    headers['referrer-policy'] = { value: 'same-origin' };
    headers['permissions-policy'] = {
        value: 'accelerometer=(), ambient-light-sensor=(), autoplay=(), battery=(), camera=(), display-capture=(), document-domain=(), encrypted-media=(), gamepad=(), geolocation=(), gyroscope=(), fullscreen=(self), magnetometer=(), microphone=(), midi=(), payment=(), publickey-credentials-get=(), screen-wake-lock=(), serial=(), speaker-selection=(), usb=(), web-share=(), xr-spatial-tracking=()'
    };

    return response;
}
The discussion of these security headers falls beyond the scope of this post.
The source code can be also found on GitHub.
Implementation
To create all the necessary AWS resources, we will solely rely on a web browser, eliminating the need for any additional tools.
We will build the infrastructure from the ground up.
Prerequisites
Before we start, make sure to have the followings:
- An AWS account
- A registered domain name
Step 1: Create an S3 bucket
First, we need to create an S3 bucket to store our asset files for the website. Here are the steps to create a bucket:
- Sign in to the AWS Management Console and navigate to the S3 service.
- Click on the Create bucket button.
- Enter a bucket name. This name must be globally unique, across all S3 bucket names, so choose something that is unlikely to be already taken. Let’s use
my-website-bucketas an example for this post. - Choose the region you want to create your bucket in.
- Leave the default options for the remaining settings for now and click Create bucket at the bottom of the page.
The following configuration options are crucial:
- Static website hosting: This should be disabled.
- Block public access (bucket settings): All public access must be blocked.
- Object Ownership: It should be Bucket owner enforced.
- Bucket policy: This needs to be empty for now, but we will add a policy later.
Step 2: Upload the asset files
Next, we need to upload our asset files, the website itself, to the newly created S3 bucket. Here’s how to do it:
- Click on the bucket we just created to open its details page.
- Click on the Objects tab.
- Click on the Upload button.
- Click on the Add files button and select the files to upload.
- Click on the Upload button to upload the selected files.
At this point the website is not yet accessible to anyone.
Step 3: Create a CloudFront distribution
Next step is to create a CloudFront distribution. Here are the steps:
- Select the Distributions menu.
- Click on the Create distribution button.
- In the Origin section:
- Add the recently create S3 bucket to the Origin domain.
- Set Origin access to Origin access control settings.
- CloudFront will provide an S3 bucket policy later which needs to be add to the S3 bucket we have just created.
- In the Default cache behavior set the following values:
- Compress objects automatically: Yes
- Viewer protocol policy: Redirect HTTP to HTTPS
- Allowed HTTP methods: GET, HEAD
- Default root object: index.html
- Leave everything else on the default setting.
We have a CloudFront distribution, however it is not yet able to access the S3 bucket without the policy statement which we will add in a later step.
Step 4: Configure the CloudFront distribution
A few more steps are needed in order to consider our CloudFront distribution ready for business.
Add error pages
Ensuring a positive user experience involves providing clear and helpful error messages. To accomplish this, we need to incorporate custom error responses.
For now, we will only add a single custom error response. These are the steps:
- Navigate to CloudFront / Distributions.
- Select the previously create distribution.
- Navigate to the Error pages tab.
- Click on the Create custom error response
- Set the HTTP error code to 403: Forbidden
- Set Customize error response to Yes
- Set the Response page path to /404.html (this is not a typo)
- Set the HTTP Response code to 403: Forbidden
In cases where a user attempts to access a non-existent resource, both S3 and CloudFront will respond with a 403 HTTP status code. However we will handle this as we would handle a 404 HTTP status code, so we will tell to the user that the requested resource is not found.
Add CloudFront functions
CloudFront functions are not tied to a single distribution. Therefore we need to add them separately and later link them.
Create CloudFront functions
Please follow these steps to create a CloudFront function:
- Navigate to CloudFront / Functions.
- Click on the Create function button.
- Set the name of the function:
url-rewrites. - Click on the Create function button.
At this point the function is in Development state.
- Add the function itself to the Function code section, use the above code snippets.
- Click Save changes.
- We can skip testing for now. 🙄
- Navigate to the Publish tab.
- Click Publish function.
The function will be published, but not associated to any distribution.
Please repeat the above steps to create the security-headers function.
Associate CloudFront functions to distribution
We need to associate a CloudFront function to a distribution, otherwise we cannot benefit from them.
These are steps for the association:
- Navigate to CloudFront / Distributions.
- Select the previously create distribution.
- Go to the Behaviors tab.
- Select the default behavior from the list.
- In the Function associations section associate the previously created functions:
- Viewer request
- Function type: CloudFront Functions
- Function ARN / Name: url-rewrites
- Viewer response
- Function type: CloudFront Functions
- Function ARN / Name: security-headers
- Viewer request
Step 5: Add S3 bucket policy
Currently, the CloudFront distribution (or anyone else) does not have the necessary access right to retrieve the content stored in the S3 bucket.
For security reasons we allow access only for the CloudFront distribution to the S3 bucket.
The following steps are required to add the bucket policy:
- Navigate to S3 / Buckets.
- Select the previously created bucket.
- Go to the Permissions tab.
- Click the Edit button in the Bucket policy section.
- Add the below policy or the provided one by CloudFront:
{
    "Version": "2008-10-17",
    "Id": "PolicyForCloudFrontPrivateContent",
    "Statement": [
        {
            "Sid": "AllowCloudFrontServicePrincipal",
            "Effect": "Allow",
            "Principal": {
                "Service": "cloudfront.amazonaws.com"
            },
            "Action": "s3:GetObject",
            "Resource": "arn:aws:s3:::<BUCKET_NAME>/*",
            "Condition": {
                "StringEquals": {
                    "AWS:SourceArn": "arn:aws:cloudfront::<ACCOUNT_ID>:distribution/<DISTRIBUTION_ID>"
                }
            }
        }
    ]
}- Do not forget to replace the
<BUCKET_NAME>,<ACCOUNT_ID>and<DISTRIBUTION_ID>. - Click Save changes.
Step 6: Enable logging in CloudFront
Enabling logging for CloudFront is a straightforward process. Let’s explore how to do it:
- Create an S3 bucket for storing the logs.
- Navigate to CloudFront / Distributions.
- Select the previously created distribution.
- Go to the General tab.
- Click on the Edit button in the Settings section.
- In the Standard logging section select the On option.
- Select the S3 bucket where CloudFront should place the logs, but this bucket should NOT be the same as where the website’s content is stored.
- The selected S3 bucket requires some configuration, please follow the instructions stated in this article.
While collecting logs is a straightforward task, processing them can be challenging. For more detailed information on this topic, please refer to the Analyzing standard logs article.
Step 7: Request a public SSL certificate
Here’s a step-by-step guide on how to request an SSL certificate from AWS using the Certificate Manager service:
- Navigate to the AWS Certificate Manager service.
- Click on the Request a certificate to begin the process.
- Select the Request a public certificate option.
- Click on the Next button.
- Add your fully qualified domain name, for example www.my-website.com.
- Select the DNS validation option to validate the domain name.
- Select the RSA 2048 key algorithm for certificate.
- Click on the Request button.
- Depending on the validation method you selected, follow the instructions provided by AWS to complete the validation process. This may involve responding to an email or updating DNS records.
Step 8: Associate the SSL certificate with the CloudFront distribution
Once the SSL certificate is issued and validated, we can associate it with our CloudFront distribution. Let’s check how to do it:
- Navigate to CloudFront / Distributions.
- Select the previously created distribution.
- Go to the General tab.
- Click on the Edit button in the Settings section.
- Set the Alternate domain name (CNAME) to www.my-website.com. What was added as a fully qualified domain name when we requested the SSL certificate.
- In the Custom SSL certificate dropdown select the recently issued certificate.
- Set the Security policy to TLSv1.2_2021.
- Click on the Save changes button.
Step 9: Create DNS record
We have reached the final step, which involves creating a DNS record in Route 53 to associate the registered domain name with the CloudFront distribution. This allows users to access the website using the domain name we’ve chosen.
Here’s a step-by-step guide on creating a DNS record in Route 53 for the CloudFront distribution:
- Navigate to the Route 53 service.
- Select the hosted zone corresponding to the domain.
- In the Records section click on the Create record button.
- In the Record name field enter www.
- Set the Record type to A (for IPv4).
- In the Alias section, select Yes and choose the CloudFront distribution we have created recently from the drop-down list.
- Leave the Routing policy as Simple routing (default).
- Click on the Create records button to create the DNS record.
Once the DNS record is created, it may take some time for the changes to propagate.
After the propagation period, the website should be accessible through the domain, for example: https://www.my-website.com
Pricing
Let’s talk about the ugly part, and check how much do we need to pay on a monthly basis.
The services utilized and associated costs are as follows:
- S3: $0
- CloudFront: $0
- Certificate Manager: $0
- Route 53: $1.5
All together we need to pay $1.5 / month. This is a great news, we do not need to be a millionaire to start hosting a static website. 🤑
Let’s break down these costs and check them in details.
S3
The expenses associated with Amazon S3 comprise storage and bandwidth. The exact expenses vary depending on the size of the asset files. We only transfer data between the S3 bucket and the CloudFront distribution which is free.
The official S3 page states the following:
As part of the AWS Free Tier, you can get started with Amazon S3 for free. Upon sign-up, new AWS customers receive 5GB of Amazon S3 storage in the S3 Standard storage class; 20,000 GET Requests; 2,000 PUT, COPY, POST, or LIST Requests; and 100 GB of Data Transfer Out each month.
Initially the website’s content will be only a few MB, maybe a few hundred MB. So it will fall into the free tier.
Please visit the Amazon S3 service’s page for more pricing details.
CloudFront
The CloudFront pricing is based on the data transfer out, number of HTTP/HTTPS requests and the number of CloudFront function invocations.
CloudFront has a very generous free tier:
Included in Always Free Tier
- 1 TB of data transfer out per month
- 10,000,000 HTTP or HTTPS Requests per month
- 2,000,000 CloudFront Function invocations per month
- Free SSL certificates
- No limitations, all features available
We have just started with our static website, so we do not have an enormous amount of content nor a large number of visitors, so we will likely stay in the tier for a while.
Please visit the Amazon CloudFront Pricing page for more pricing details.
Certificate Manager
The official page of the service states:
Public SSL/TLS certificates provisioned through AWS Certificate Manager are free.
We use the AWS Certificate Manager, so we will get our certificate for free.
Please visit the AWS Certificate Manager Pricing page for more pricing details.
Route 53
The pricing of the Route 53 service is based on:
- the number of managed hosted zones
- We have a single hosted zone which costs us $0.50 / month.
- the number of DNS queries
- We have DNS queries for A alias records which are free of charge.
- the number of managed domain names
- We registered a single domain name, which costs us $1 / month.
All together we will pay $1.5 / month.
Note
Please note that the costs of registering a domain name varies depending on the top-level domain (TLD) and the registrar, plus the additional services such as WHOIS privacy.
Please visit the Amazon Route 53 pricing page for more pricing details.
Conclusion
Hosting a static website on Amazon S3 using CloudFront, which is secure, scalable, highly available, performant and cost effective, is relatively simple and easy.
This configuration is considered suitable for a production environment and is optimized for a static website with a moderate number of visitors.
However there is always room for improvement. 👀
Let’s briefly check a few improvement ideas:
- Infrastructure as Code: To setup manually the above mentioned infrastructure can be time consuming, but ultimately annoying 😒. Automation can be our saviour. For example, we can use AWS CDK, AWS CloudFormation or Terraform to manage our infrastructure.
- Monitoring and alerting: It is always a good idea to monitor our website, because in this way, for example, we can:
- detect and respond to issues faster
- optimize costs and resource utilization
- Detailed analytics: The collected data by CloudFront can help optimizing the website’s content and make informed decisions to improve the user experience.
Additional resources
CloudFront
- Amazon CloudFront
- Reports, metrics, and logs
- CloudFront and edge function logging
- How do I turn on logging for my CloudFront distribution?
- Introducing CloudFront Functions – Run Your Code at the Edge with Low Latency at Any Scale
- Getting started with a secure static website
- Adding HTTP Security Headers Using Lambda@Edge and Amazon CloudFront
- Working with policies
- Adding or removing HTTP headers in CloudFront responses
- Invalidating files
- Specifying a default root object
- Add index.html to request URLs that don’t include a file name