Hosting a static website on Amazon S3

Hosting a simple static website on Amazon Web Services (AWS) can be daunting at first, but luckily it’s quite straightforward. One option for hosting a static website on AWS is to use Amazon S3.
In this post, we will walk through the steps to host a static website using only S3 and only the AWS Management Console. So I can show how I started to host my website initially.
Prerequisites
Before we start, make sure to have the followings:
- An AWS account
- A registered domain name
While registering a domain name is not mandatory, it is possible to host a static website on Amazon S3 without it. If you are looking to save money on a domain, you can simply skip Step 4.
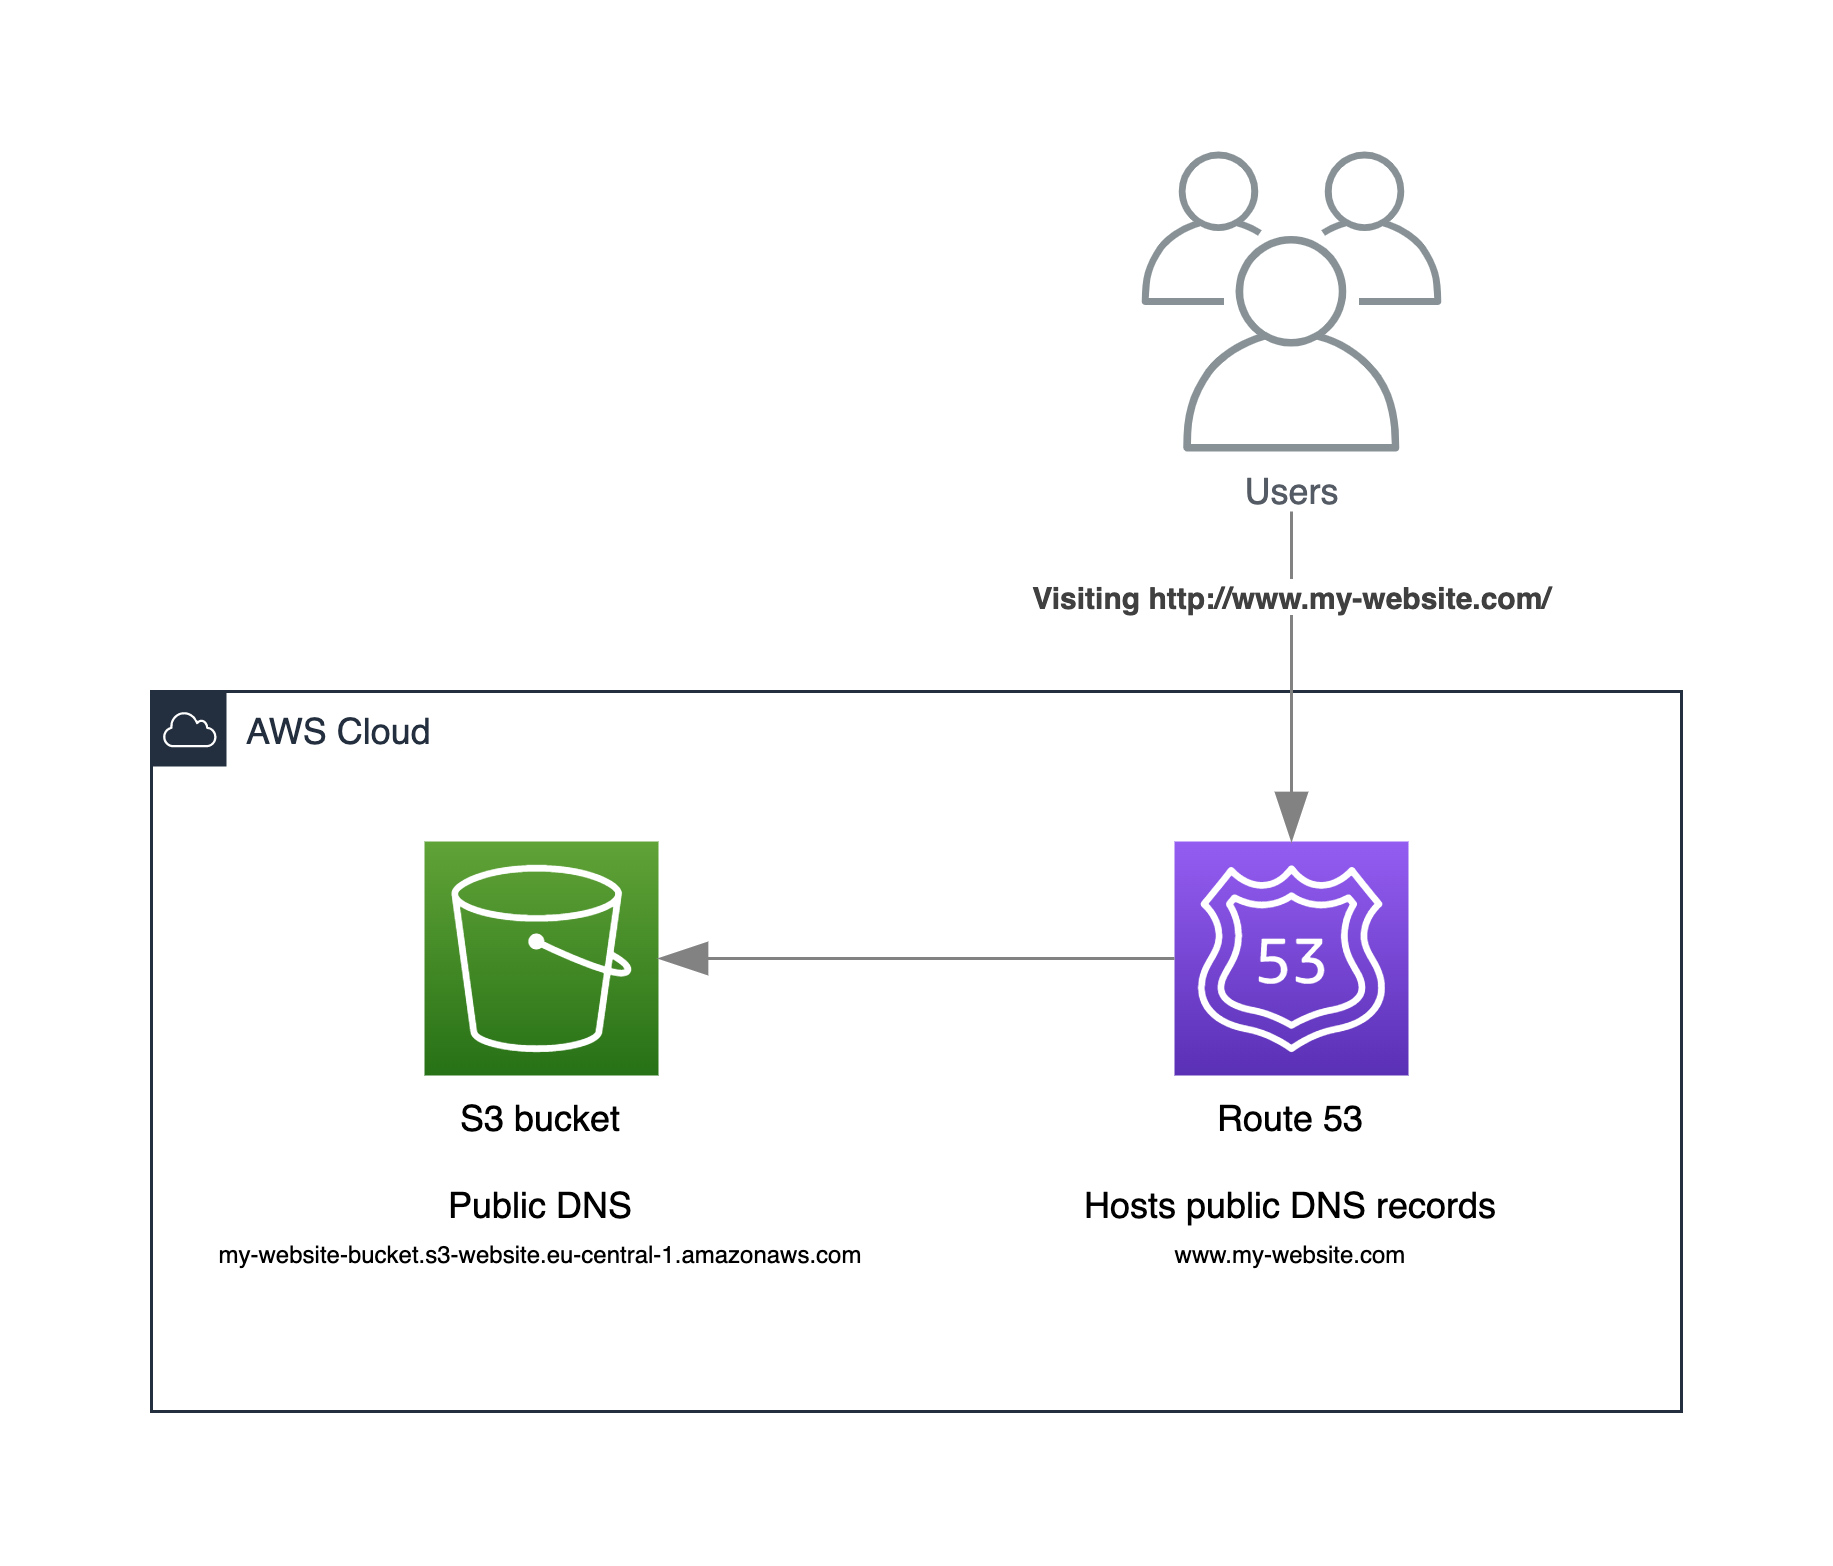
Target architecture
The target architecture is relatively simple, we have 2 major components: Amazon S3 and Route 53. Where S3 is doing the heavy lifting, the website hosting and Route 53 is responsible for handling DNS related things.
Step 1: Create an S3 bucket
First, we need to create an S3 bucket to store our asset files for our website. Here are the steps to create a bucket:
- Sign in to the AWS Management Console and navigate to the S3 service.
- Click the Create bucket button.
- Enter a bucket name. This name must be globally unique, across all S3 bucket names, so choose something that is unlikely to be already taken. Let’s use my-website-bucket as an example for this post.
- Choose the region you want to create your bucket in.
- Leave the default options for the remaining settings for now and click Create bucket at the bottom of the page.
Step 2: Configure the bucket properties
Now that we have created our bucket, we need to configure its properties to allow it to host our website. For this we need to do following things:
- Enable static website hosting
- Allow public read-only access
Enable static website hosting
- Click on the bucket we just created to open its details page.
- Click on the Properties tab.
- Click on the Edit button in the Static website hosting section.
- Select Enable in the Static website hosting section.
- Select the Host a static website option under Hosting type.
- Enter the name of your index document (e.g. “index.html”).
- Enter the name of your error document (e.g. “error.html”) - this is optional.
- Click Save changes.
Allow public read-only access
Change “Block Public Access” settings
Amazon S3 blocks public access by default to buckets. If we want to use our bucket to host a static website, we need to make it publicly accessible.
- Click on the bucket we just created to open its details page.
- Click on the Permissions tab.
- Click on the Edit button in the Block public access section.
- Uncheck the Block all public access and make sure that all the other checkboxes are also unchecked.
- Click Save changes.
Attach a bucket policy
- Click on the bucket we just created to open its details page.
- Click on the Permissions tab.
- Click on the Edit button in the Bucket policy section.
- Copy the below bucket policy and paste it into the Bucket policy editor.
{
    "Version": "2012-10-17",
    "Statement": [
        {
            "Sid": "PublicReadGetObject",
            "Effect": "Allow",
            "Principal": "*",
            "Action": "s3:GetObject",
            "Resource": "arn:aws:s3:::my-website-bucket/*"
        }
    ]
}- Click Save changes.
Step 3: Upload the asset files
Next, we need to upload our asset files, the website itself, to the newly created S3 bucket. Here’s how to do it:
- Click on the bucket we just created to open its details page.
- Click on the Objects tab.
- Click on the Upload button.
- Click on the Add files button and select the files to upload.
- Click on the Upload button to upload the selected files.
At this point our website is available through our S3 endpoint URL, for example: http://my-website-bucket.s3-website.eu-central-1.amazonaws.com.
Step 4: Map the domain
Finally, we need to map our domain to our S3 bucket. Here is how to do it:
- Go to the domain registrar and create a new CNAME record pointing to the Amazon S3 bucket’s endpoint URL. For example, if your S3 endpoint URL is my-website-bucket.s3-website.eu-central-1.amazonaws.com, create a CNAME record with the domain registrar that points www.my-website.com to my-website-bucket.s3-website.eu-central-1.amazonaws.com.
- Wait for the DNS changes to propagate (this can take anywhere from a few minutes to several hours).
- Once the DNS changes have propagated, visit the website at http://www.my-website.com. The website should now be live! 🚀
Pricing
Hosting a static website on Amazon S3 with a registered domain name can be a cost-effective option for those who don’t want to spend too much money on hosting.
Depending on the domain registrar and the top-level domain (TLD), registering a domain name can cost anywhere from a few dollars to hundreds of dollars per year.
The actual cost of hosting a static website on Amazon S3 will largely depend on the amount of storage and bandwidth required by the website. In most cases, the cost can be as low as a few dollars per month, making it an affordable option for individuals and small businesses alike.
Amazon S3
The expenses associated with Amazon S3 comprise storage and bandwidth. The exact expenses vary depending on the size of the asset files and the number of visitors generating browser requests. There are no setup fees or minimum charges involved.
Please visit the Amazon S3 service’s page for more pricing details.
Domain name registration
The cost of registering a domain name varies depending on the top-level domain (TLD) and the registrar. Popular TLDs such as .com, .net, and .org usually cost $10-$20 per year. However, some TLDs can be more expensive, especially if they are country-specific or have special purposes such as .io or .gov.
In addition to the annual fee, some registrars may also charge extra fees for services such as WHOIS privacy. It is important to compare prices and features among different registrars before making a purchase to ensure getting the best deal.
Conclusion
Hosting a static website on Amazon S3 is a quick and easy way to get the website up and running. Although this is a good initial step, however this is not what we really want as our production setup. We need a few additional elements to establish a hosting solution that is highly available, performs well and can be considered production ready. For example:
- Make it more scalable and performant by using a content delivery network (CDN).
- Make the communication secure by using HTTPS (encrypt data in transit).
- Make the S3 bucket private and the website should be only accessible through the CDN.
- Get usage related data by enable logging.
- Add error handling and feedback.
I will write about these additions in another post, so stay tuned.
But for now let’s celebrate 🎉, because our website is up and running, so we can start sharing content with the world.